Cecostomy
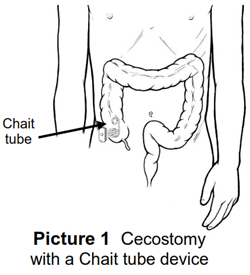
A cecostomy is a surgically-created opening between the belly (abdomen) and the colon (cecum). The opening is usually on the lower right side of the abdomen. A tube is placed in the opening. This lets you give a large volume flush, or enema, at the beginning of the colon instead of at the end through the rectum. Two types of tubes can be placed:
- A chait tube (Picture 1)
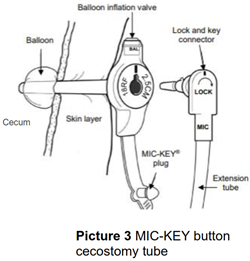
- A button device (Picture 3 - under Types of Tubes)
Types of Tubes
The surgeon will decide which tube is best for your child during surgery. The two most common tubes we use are:
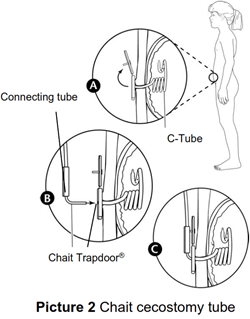
- Chait Trapdoor™ Cecostomy Tube - The outside part of the chait trapdoor fits snugly against the belly (abdomen). The inside part coils itself inside the cecum like a pigtail (Picture 2). You open the trapdoor to connect the adapter to give the flush.
- MIC-KEY® Button Device - The outside part of the Mic-KEY tube sits on top of the belly (abdomen). It is held in place by a balloon that is inflated inside the cecum (Picture 3). A MIC-KEY extension set connects to the tube to give the flush.
Before Surgery
Your health care team will talk to you about your child’s surgery and what to expect. This includes the arrival time, directions on where to go, the bowel preparation (prep), and when your child should stop eating or drinking before surgery. Check your phone and messages for calls from your health care team.
Surgery
The surgery will take about 2 hours. If your child is having other procedures at the same time, the surgery may take longer. The tube can usually be placed using tiny cuts (incisions) on your child’s abdomen. Sometimes a larger incision may be needed.
After Surgery
After your child wakes up from surgery, they will go to the hospital inpatient surgery unit to recover.
- Once your child wakes up from surgery, they can start drinking. When they are drinking well, they can have regular, solid food. Before they go home, your child must be able to handle their regular diet.
- During your child’s hospital stay, you will be taught how to take care of their cecostomy tube, provide site care, and give their flush.
- Your child will be in the hospital for a few days after surgery. If they had other procedures, they may stay longer.
The Cecostomy Flush
- The first flush is usually done about 2 days after surgery and after your child has eaten 2 good meals.
- Most children need a flush 2 times each day for the first 2 weeks. After 2 weeks, most children only need 1 flush each day.
- The Wound/Ostomy Team will teach you and your child how to do the flush. They will also teach you how to care for the tube site and get supplies.
Discharge
- Flush supplies will be given to you before you are discharged from the hospital. After that, you will get your supplies from your homecare company. This will be set up by the inpatient team.
- The prescription for your flush supplies will be set up by the inpatient team. You’ll get your flush solution from the pharmacy.
Cleaning and Caring for the Cecostomy
- Your child may have white bandage strips across their incisions. The strips will fall off on their own in 7 to 14 days. If they don’t fall off after 14 days, remove them yourself.
- Your child may have a special glue across their incisions. The glue will flake off on its own in 7 to 14 days. Do not put ointments over the glue or peel it off.
- Tan, yellow, or bloody drainage from the cecostomy site is normal. Clean the site each day with a no-rinse foam cleanser and a cotton swab (Q-tips®) to prevent irritation. You may also use fragrance-free soap and water. Always pat the site dry.
- A cotton swab can be used to remove dried drainage from around the tube. If you can’t remove all the dried drainage on the first try, try again the next day. Put a warm, soapy washcloth over the site, and let it sit. This may soften the drainage and help it come off.
- If you have trouble removing dried drainage around the site, you can use an ointment (Aquaphor® or Neosporin®) to help soften the drainage.
- Do not place a gauze or cotton pad (dressing) underneath the device unless told by your health care team. It is usually okay to shower, swim, and take tub baths after surgery unless told otherwise by your healthcare team. Your child should NOT do contact sports for 2 weeks after surgery. If your child is having other procedures at the same time, these instructions could be different.
How to Flush the Cecostomy at Home
Follow these steps when giving the cecostomy flush at home:
1. Gather these supplies - gravity bag, tube adapter, timer, measuring cup, flush solution (as prescribed by your health care team), and activities for your child to use while on the toilet.
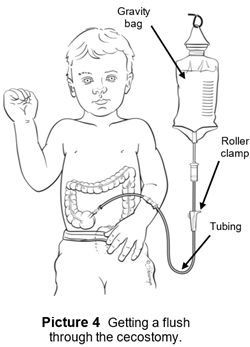
2. Close the roller clamp on the gravity bag by rolling it all the way down (Picture 4).
3. Measure the solutions into a measuring cup or cylinder and stir to combine. Pour the solution into the gravity bag. This is usually a combination of saline, glycerin, and/or castile soap and is determined by your child’s health care provider.
4. Remove air from the tubing by rolling the clamp up and letting fluid run through. This is called priming the tubing. Once you see drips at the end of the tubing, move the clamp down to close it.
5. Hang the gravity bag on a shower curtain rod or wall hook at your child’s shoulder height or higher. Have your child sit on the toilet.
6. Connect the adapter to the cecostomy tube, then hook up the gravity bag to the end of the adapter.
7. Slowly open the roller clamp and let the entire solution run through over 5 to 10 minutes. If your child has cramping during the flush, slow the fluid down by moving the roller clamp on the bag down to slow the flush.
8. When all the solution has gone in, close the roller clamp.
9. Remove the adapter from the cecostomy tube.
10. Your child should sit on the toilet for 30 to 45 minutes after the solution goes in to let their bowels empty.
11. Clean the gravity flush bag and adapter with mild soap and warm water. Do not use any harsh chemicals. Let the supplies air-dry. You can reuse the adapter and bag.
During the first month, your child may have accidents as they are healing from surgery. After your child’s body has healed, the health care team will work to change the flush regimen, if needed. If your child is having frequent accidents during the first month after surgery, contact the health care team.
Follow-up
- Your child will be scheduled for a follow-up visit about 1 month after surgery to make sure everything has healed well.
- All patients need a follow-up one time each year.
- The cecostomy tube needs to be changed about every 6 months. The medical team will talk to you about when, where, and how this will happen.
- Supplies and prescriptions:
- If you haven’t gotten supplies in the mail from your homecare company, let the health care team know at your appointment.
- A long-term prescription for the flush solution will be sent to your local pharmacy. Contact the pharmacy when you need refills.
When to Contact the Health Care Team
- Contact the health care team if your child has:
- Fever over 101° Fahrenheit (F) or 38.3° Celsius (C) and you think the site might be infected.
- Redness, more drainage than normal, warmth, or pain at the cecostomy site.
- Nausea, throwing up (vomiting), or can’t handle food or liquids.
- Bloated belly with little or no poop after a flush has been given.
- A possible broken tube or a tube that is too loose, too tight, or is not flushing the right way.
- A build-up of raised tissue that forms on the skin where the tube goes into the body. This tissue is called granulation tissue. This can sometimes bother your child and be uncomfortable.
- If the tube comes out before your first follow-up visit, contact your surgical team right away. Place the lubricated Foley you got at discharge into the opening. Tape it in place. Do not inflate the balloon. Do not give a flush until you’re told it’s okay by your medical team.
Helping Hands™ Patient Education Materials
Helping Hands™ are easy-to-read guides about different illnesses, therapies, surgeries, and more. They’re created by the Patient Education team at Nationwide Children’s Hospital and are reviewed and approved by clinical staff, like nurses, doctors, pharmacists, and psychologists. Nationwide Children's Hospital is not responsible for misuse of information in patient education materials, including Helping Hands.
HH-II-260 | ©2023, revised 2025, Nationwide Children’s Hospital